.png?1677767993 "MikeSPORT")
Replacing a bicycle inner tube - a quick guide
Replacing a bicycle tube is an inevitable challenge for every cyclist. Don't worry - it doesn't have to be difficult! In our practical guide, we will show you step by step how to easily and effectively replace the inner tube on your bike. Thanks to this guide, you will be sure that you can deal with any problem related to the inner tube, and your rides will always be safe and enjoyable. Read on and discover the secrets of changing an inner tube!
Replacing a bicycle tube - how to replace a bicycle tube?
Replacing a bicycle tube can be one of the more irritating tasks cyclists face. However, sometimes there is no other choice and we need to quickly replace the inner tube in order to continue riding. In this article, we will show you step by step how to replace the inner tube on your bike.
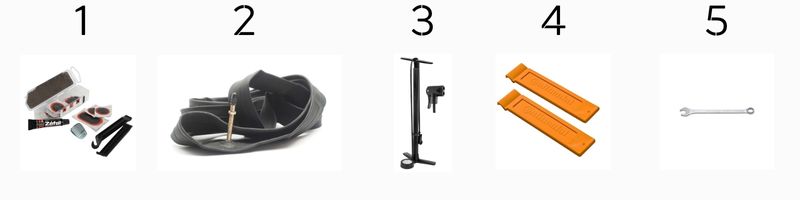
You need a few tools and accessories to change a bicycle tube. Here's what you'll need:
- A set of patches and glue - useful when the inner tube is punctured and you do not need to replace it with a new one.
- Possibly new bicycle tube - if the current bicycle tube is damaged and cannot be patched, you must have a new tube that will fit your bike.
- Bicycle pump is necessary to inflate a new inner tube.
- Bicycle tire levers - they will be useful when you want to take out the old inner tube.
- Wrench for unscrewing the hub bolts in a bicycle - needed when you want to take the wheel off the bike frame and the wheel is not a quick-locker.
- Or a bicycle tire if damaged / cut and not suitable for further driving. It is worth checking when replacing a bicycle inner tube that the tire is not cracked due to age, because this may be the cause of the defect.
Make sure you have all the necessary tools and accessories before you start replacing the inner tube. This will save you time and avoid unnecessary problems during the replacement.
Step 1: Unclip the wheel
The first step is to unclip the wheel from the bike frame. For most bikes, you only need to unscrew 2 bolts (usually size 15, and if your bike has a quick-release wheel, you can remove the wheel without using a wrench.
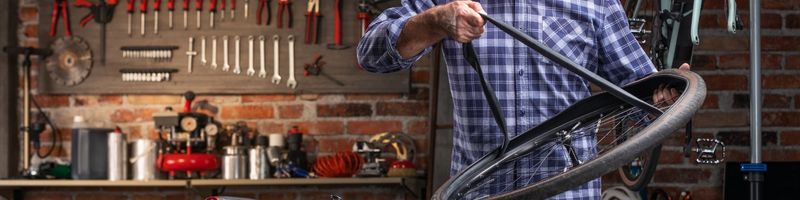
Step 2: Remove the tire from the rim
They have special tire levers pry the tire and stretch it outside the rim, then drag the lever around the rim.
It is important not to pull the tire off the rim and not to twist it relative to the rim, this will make it easier for us to locate any element that may still be in the tire.
Step 3: Pull the tube out of the tire.
When the wheel is unfastened and the tires are removed from the rim on one side, you can proceed to remove the inner tube. Usually it is enough to gently pull it on the ends of the inner tube to remove it from the tyre. Remember to unscrew all the elements on the valve in the inner tube.
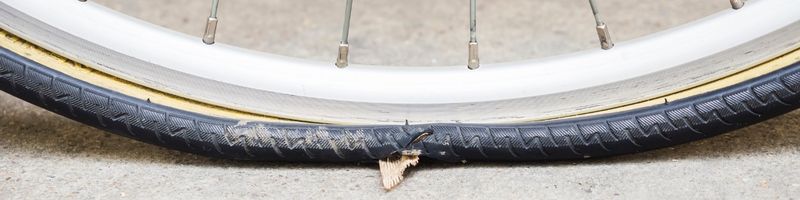
Step 4: Find the cause of the puncture
Before repairing the inner tube, it is always worth checking what caused the puncture. It can be, for example, a sharp object on the road or tire damage. Remember when pulling out the inner tube which direction it was facing then inflate the pulled inner tube and look for a hole and mark it with chalk (it is included with the bicycle patches in the box), it will be easier for you to locate the hole. Then put the inflated inner tube to the wheel (remember to place the valve where there is a valve hole in the rim), then see where the damage is on the bicycle inner tube and check the tire in this place for a sharp element. If the tire is damaged, it is worth replacing it with a new one
Step 5: Patch the old one
Once you have found the cause of the puncture and fixed it, you can proceed to insert a new tube (go to step 6) or repair it.
If you repair the inner tube with patches, find the trace marked with chalk, rub with sandpaper or a grater attached to the inner tube box, then select the size of the patch, smear the patch with glue and press it to the inner tube. After about 30 seconds, you can start mounting the bicycle tube. When you inflate the inner tube, it will press the patch to the tire itself.
Step 6: Inserting the inner tube
First, insert the valve into the hole in the rim, then spread the inner tube evenly around the wheel. Then put the tire on the rim.
Step 7: Inflate the tube
After inserting a new inner tube, inflate the wheel again.
For MTB bikes, the recommended pressure is 2-3 bar, for trekking bikes it will be 3-4 bar, for road bikes even 9 bar. The recommended minimum and maximum tire pressures are printed on the bicycle tyre.
Always inflate a bicycle wheel before putting it on, because if, for example, the tire is placed crookedly on the rim, you can quickly deflate and correct it, without the need to unscrew the wheel, it is simply easier to do this.
Step 8: Put the wheel back into the frame
Put the wheel back on the bike frame. Make sure the wheel is seated properly and the bolts are tightened or the quick-release is tightened sufficiently.
Summary
Replacing a bicycle tube may seem like a daunting task, but with practice it becomes easier. It is important to have the right tools and accessories and follow the steps mentioned in the article. Remember that before replacing the inner tube, it is always worth checking what was the cause of the puncture and eliminating it to avoid further problems. Now that you know how to replace your bike's inner tube, there's nothing stopping you from enjoying safe and comfortable rides!